Ever wished you could try on those must-have trainers or see if that new sofa fits perfectly before buying online? Now you can with the power of 3D models!
This technology is transforming e-commerce, boosting sales and slashing returns. But what if you’re not a tech whiz? Don’t worry – this comprehensive guide makes adding interactive 3D models to your Shopify store a breeze.
We’ll cover everything: choosing the right model, adding it to your product page – no coding needed.
Say goodbye to boring product photos! Get ready to transform your store into a dynamic shopping experience with 3D models. Start exploring now!
Choosing the Right 3D Model: Your Gateway to Stunning Product Visualisation
Finding the perfect 3D product models is the first step towards bringing your products to life on Shopify. But with various formats and sources floating around, choosing the right one can feel overwhelming. Fear not! This guide will shed light on the most popular options, empowering you to make an informed decision.
- File format: Shopify supports GLB (broad compatibility) and USDZ (optimised for mobile AR on Apple devices (iPhones and iPads).
- Source: For most Shopify stores, starting with free 3D models on sites like Sketchfab and Threedify is a great place to begin. If you need a large selection, paid marketplaces like TurboSquid or CGTrader are your next stop. For something truly custom, agencies like ElevationX Studios can create models specifically for your products. Advanced users might enjoy creating their own using Blender.
- Complexity: Balance model detail with file size to ensure smooth loading speeds.
- Product type: Consider the level of visual detail required for different product categories.
- Commercial use: Always verify licencing terms for intended use.
Uploading and Optimising Your 3D Model in Shopify: A Step-by-Step Guide
1. 3D Model Upload:
- Access your Shopify admin panel.
- Navigate to “Products” and select the desired product.
- Click “Add media” and choose “3D model.”
- Upload your GLB or USDZ file.
2. Optimise for performance:
- File size: Keep it under 5MB for optimal loading.
- Textures: Use efficient JPG or PNG formats and reduce resolution as needed.
- Lighting and animation: Simple setups perform better. Limit complex animations and offer “play/pause” control.
- Preview and test: Ensure smooth functionality on different devices and browsers.
3. Troubleshooting Common Issues:
- Unsupported format: Convert incompatible formats.
- Slow loading: optimise file size and textures. Contact the ISP for store-wide issues.
- Model not displaying: Verify upload and file integrity. Clear the browser cache. Contact Shopify support.
Understanding File Formats:
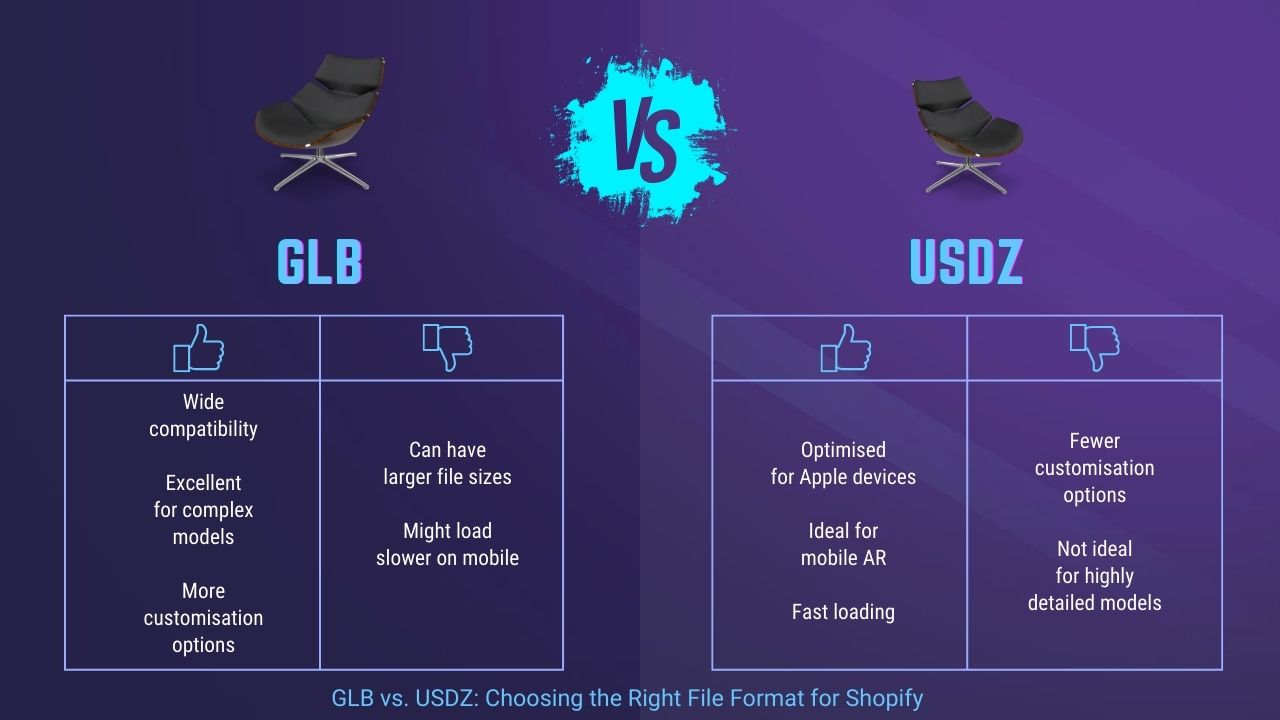
Shopify currently supports two main 3D model formats:
- GLB (GL Transmission Format): This versatile format combines both the model and textures into a single, compressed file. GLB offers broad compatibility across different platforms and viewers, making it a great universal choice. Remember, overly detailed models (especially textures) lead to larger files and slower loading.
- USDZ files, created by Apple, are perfect for showcasing products in AR on iPhones and iPads due to their compact size. However, USDZ offers fewer customisation options compared to GLB.
Comparison Table for 3D Model File Formats: GLB vs. USDZ
| Feature | GLB (GL Transmission Format) | USDZ (Universal Scene Description Zip) |
|---|---|---|
| Compatibility | Broad compatibility across various platforms and devices. | Optimised for iOS devices, offering a seamless AR experience on Apple products. |
| File Size | Can be larger due to combined model and texture data, impacting loading times. | Typically smaller, it is optimised for quick loading on mobile devices. |
| Optimisation | Supports complex models and high-resolution textures but requires careful optimisation. | Streamlined for mobile use, but with fewer customisation options. |
| Use Case | Ideal for a wide range of e-commerce platforms and viewer applications. | Best suited for brands targeting Apple users with AR experiences. |
| AR Support | Requires conversion for AR experiences on Apple devices. | Direct support for AR provides an immersive experience on iOS without extra steps. |
| Customisation | Offers extensive customisation and interactivity options through animations and textures. | Limited by Apple’s specifications, offering fewer opportunities for customisation. |
Where to Find Your Perfect Augmented Reality Match:
Free Resources:
- Sketchfab is a vast library of user-generated models, many of which are available for free commercial use. Offers diverse categories and varying quality levels. Includes 3D model store as well as VR models store.
- Threedify: Free models specifically designed for 3D printing, often adaptable for product visualization. Requires checking individual licences for commercial use.
- Clara.io: Curated collection of high-quality models, some offered with free commercial licences.
Paid Options:
- TurboSquid is an extensive marketplace with professional-grade models across various categories. Offers diverse pricing options and detailed quality information.
- CGTrader is another vast marketplace catering to various budgets and design needs. Provides advanced search filters and quality guarantees.
- Custom 3D Modelling Services: Hire 3D modelling agency for tailored solutions. Shop 3D model of your product. Ideal for unique products or specific customisation needs, but expect a costs of $69/£59+ per product.
You can find and view 3D models of some ecommerce products in furniture, jewellery, gym equipment, lighting, beauty, art and even an iPhone.
DIY 3D Modelling:
For the adventurous, beginner-friendly software like Blender allows you to create your own models. This approach offers complete control and customisation but requires time, effort, and learning the software.
Remember:
- Consider your product complexity and desired level of detail when choosing the file format and source.
- Always check individual model licences for commercial use restrictions.
- Don’t hesitate to experiment with different sources and formats to find the best fit for your needs and budget.
By following these tips, you’ll be well-equipped to select the perfect 3D model that elevates your Shopify store and engages customers like never before.
Uploading and Optimising Your 3D Model in Shopify: A Step-by-Step Guide
Now that you’ve chosen your stunning 3D model, it’s time to bring it to life on your Shopify store! This guide will walk you through the upload process, share optimisation tips for peak performance, and help you troubleshoot any hiccups along the way.
Step 1: Upload Your Model:
- Head to your Shopify admin panel. Navigate to “Products” and select the product you want to add the 3D model to.
- Scroll down to the “Media” section. Click on “Add media” and choose “3D model.”
- Drag and drop your chosen 3D model file (GLB or USDZ format) into the designated area. Alternatively, click “Browse” to select the file from your computer.
- Click “Add” to upload the model. You’ll see a preview of your model appear.
Step 2: Optimisation for Smooth Performance
- File Size: Keep it light! Shopify recommends file sizes under 5MB for optimal loading speed. Consider using online compression tools or reducing texture resolution if your file exceeds the limit.
- Textures: Use efficient image formats like JPG or PNG for textures. Reduce texture resolution if necessary without compromising visual quality.
- Lighting and Animation: Simple lighting setups tend to perform better. Limit complex animations, and consider offering a “play/pause” option for user control.
- Preview and Test: Regularly preview your model on different devices and browsers to ensure smooth loading and functionality.
Step 3: Troubleshooting Common Issues:
- Unsupported Format: Ensure your file format is GLB or USDZ. Convert incompatible formats using online tools before uploading.
- Slow Loading Times: Double-check file size and optimise textures as mentioned above. Consider contacting your internet service provider if slow loading persists across your entire store.
- Model Not Displaying: Verify the upload process was successful and the file hasn’t been corrupted. Clear your browser cache and try again. If the issue persists, contact Shopify support.
Bonus Tip: Optimise your product titles and descriptions to mention the inclusion of a 3D model, enticing customers to engage and explore your products in a whole new way!
By following these steps and incorporating optimisation tips, you’ll ensure your 3D models become seamless additions to your Shopify store, enhancing the customer experience and boosting your sales potential. Remember, a little technical finesse goes a long way in delivering a captivating and interactive shopping experience!
Unleashing the 3D Magic on Your Product Page: Integration and Customisation
Your 3D model is optimised and ready to shine, but it needs a stage to captivate your audience. Here’s how to seamlessly integrate it into your product page and personalise the viewing experience:
Embedding the Shopify 3D Viewer: Choose your approach.
1. Native Shopify 3D Viewer:
- Pros: Simple setup; no additional apps are required.
- Cons: Limited customisation options.
- To enable: Navigate to Online Store > Themes > Edit Code.
- Find the product-template.liquid file and add the following code where you want the viewer to appear:
Code snippet
{% include ‘product-3d-model’ %}
2. Third-Party 3D Viewer Apps:
- Pros: enhanced customisation, AR features, analytics.
- Cons: May require additional costs or setup.
- Popular options:
- EasyAR
- ModelViewer
- Vectary 3D and AR
- Threekit
Customising the Viewer (App-Specific)
While customisation options vary, many apps allow you to:
- Brand the viewer with your logo and colours.
- Add hotspots to highlight specific product features.
- Set the default zoom and rotation for an ideal product presentation.
- Incorporate AR functionality for immersive experiences.
Extend the 3D Experience Beyond the Store
Don’t limit the magic of 3D to your product pages! Amplify its impact by:
- Featuring 3D models in marketing campaigns (email, social media, ads).
- Creating interactive product demos for social media platforms.
- Embedding 3D models on your blog for engaging product reviews.
- Exploring AR-powered virtual try-on experiences for select products.
Remember, 3D models offer a powerful tool for storytelling and engagement. By strategically integrating them into your marketing efforts, you’ll create immersive experiences that capture attention, drive conversions, and leave a lasting impression on your customers.
Advanced Techniques and Resources: Take Your 3D Game to the Next Level
So you’ve mastered the basics of adding stunning 3D models to your Shopify store. But why stop there? Let’s explore advanced techniques and resources to unlock even greater engagement and sales potential:
1. Unleash the Power of 3D Product Customisation:
Imagine customers designing their dream sneakers or personalising phone cases in real-time, all within your 3D product viewer. This level of interactivity is now possible with apps like:
- Threekit offers a robust suite for product customisation, including colour, texture, engraving, and text options.
- Spiff: Provides a visual product configurator with real-time 3D and AR visualisation, allowing customers to personalise complex products.
- Zakeke: Features 3D and AR customisation along with virtual try-on capabilities, ideal for apparel and accessories.
By empowering customers to co-create their perfect product, you foster a deeper brand connection and boost purchase confidence.
2. Integrate the magic of augmented reality (AR):
Take your product visualisation beyond the screen with AR. Apps like:
- Shopify AR enables customers to virtually place your products in their own environment using their smartphone cameras.
- EasyAR offers AR features including object recognition, image tracking, and 3D model placement.
- Vectary 3D & AR: Provides both 3D product viewers and AR experiences, creating a seamless omnichannel experience.
- ElevationX Studios bespoke 3D Viewers & AR offer a bespoke solutions for businesses of any size from micro to enterprises. They also offer life-like 3D models of products at affordable pricing.
By letting customers “try before they buy” in the real world, AR reduces returns and drives more informed purchasing decisions.
3. Dive into a World of Helpful Resources:
- Shopify’s 3D Model Guide: An in-depth guide from Shopify covers all aspects of adding 3D models to your store.
- Shopify 3D Models Example Page: Check multiple types of AR models created by ElevationX Studios
- 3D Commerce Association: a non-profit organisation promoting the adoption of 3D technologies in e-commerce.
- 3D Model Communities: Platforms like Sketchfab and CGTrader offer forums and communities where you can connect with other 3D model enthusiasts and get help. If you need professional help you can contact the team at ElevationX Studios.
Remember, the possibilities with 3D technology are constantly evolving. By staying informed and exploring advanced techniques, you’ll ensure your Shopify store remains at the forefront of immersive and engaging product experiences.
Conclusion: Unlock the Future of E-Commerce with Stunning 3D Models
From captivating product presentations to interactive customisation and immersive AR experiences, the power of 3D product visualisation in e-commerce is undeniable. By incorporating 3D models into your Shopify store, you’re not just adding a cool gimmick; you’re investing in a strategic tool that:
- Boosts customer engagement: 3D models capture attention, encourage exploration, and deepen product understanding, leading to higher conversion rates.
- Reduces returns: By letting customers virtually interact with products, you minimise the “surprise factor” and ensure informed purchase decisions.
- Evaluate your brand image: Cutting-edge technology like 3D and AR showcases innovation and positions your brand as forward-thinking and customer-centric.
Looking ahead, the future of 3D e-commerce is even brighter. Expect advancements in real-time rendering, haptic feedback for AR experiences, and the integration of 3D printing for on-demand customisation.
Are you ready to join the 3D revolution? Take the plunge, experiment with these techniques, and let your creativity shine. Remember, the success stories of tomorrow often begin with a bold step today. Share your 3D model journey in the comments below and inspire others to unlock the full potential of this transformative technology. Together, let’s shape the future of engaging and delightful online shopping experiences!
Bonus 3D products Tips & Tricks:
Comparison Table of Popular 3D Viewer Apps for Shopify Augmented Reality:
| Feature | Shopify Native Viewer | EasyAR | ModelViewer | Vectary 3D and AR | Threekit |
| Pricing | Free | Freemium (Paid plans start at $19/month.) | Freemium (Paid plans start at $19/month.) | Freemium (Paid plans start at $49/month.) | Freemium (Paid plans start at $99/month.) |
| Customisation | Limited | Moderate | Moderate | High | High |
| AR Capabilities | No | Yes | Yes | Yes | Yes |
| Product Customisation | No | No | No | Yes | Yes |
| Analytics | No | Yes | Yes | Yes | Yes |
Note: This is just a sample comparison table, and pricing and features may change over time. It’s recommended to research each app thoroughly before making a decision.
Glossary of Terms:
- 3D File Formats: GLB (GL Transmission Format) and USDZ (Universal Scene Description Zip) are file formats used for storing 3D models.
- Texture: A digital image applied to a 3D model for surface details and colour.
- Lighting: The virtual lighting setup affects how the 3D model appears.
- Animation: movement within the 3D model, such as rotation or zoom.
- Hotspot: An interactive point on the 3D model that triggers an action like displaying information.
- AR (Augmented Reality): superimposing a 3D model onto the real world through a smartphone camera.
By incorporating these bonus elements, you can significantly enhance the value and user experience of your comprehensive guide. Remember, the key is to provide clear, visually engaging, and actionable information that empowers readers to confidently add 3D models to their Shopify stores and unlock their full potential.